Using Amazon AWS with Juju
Juju already has knowledge of the AWS cloud, which means adding your AWS account to Juju is quick and easy.
You can see more specific information on Juju's AWS support (e.g. the supported regions) by running:
juju show-cloud aws
If at any point you believe Juju's information is out of date (e.g. AWS just announced support for a new region), you can update Juju's public cloud data by running:
juju update-clouds
Gathering credential information
Amazon recommends the use of IAM (Identity and Access Management) to control access to AWS services and resources. IAM enables you to create users and groups with specific access rights and permissions, much like users and groups within a Unix-like environment. This is in contrast to the AWS-wide access that comes with using root-level secret keys.
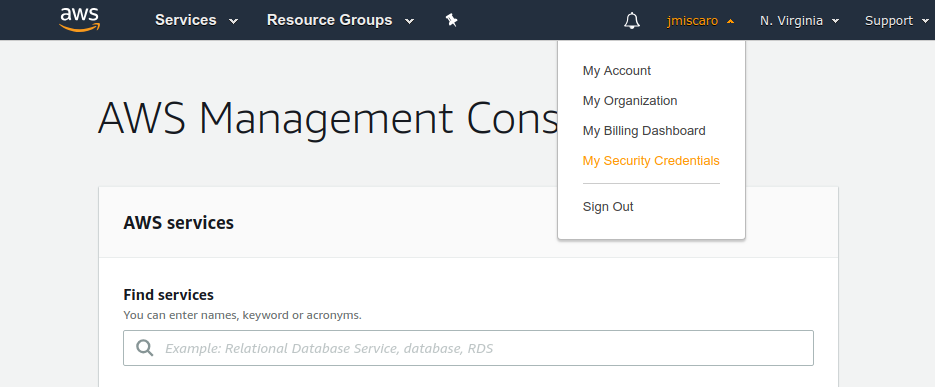
To create both a user and a group for use with Juju, click on your name from the AWS Management Console at http://console.aws.amazon.com and select "My Security Credentials" from the drop-down menu:

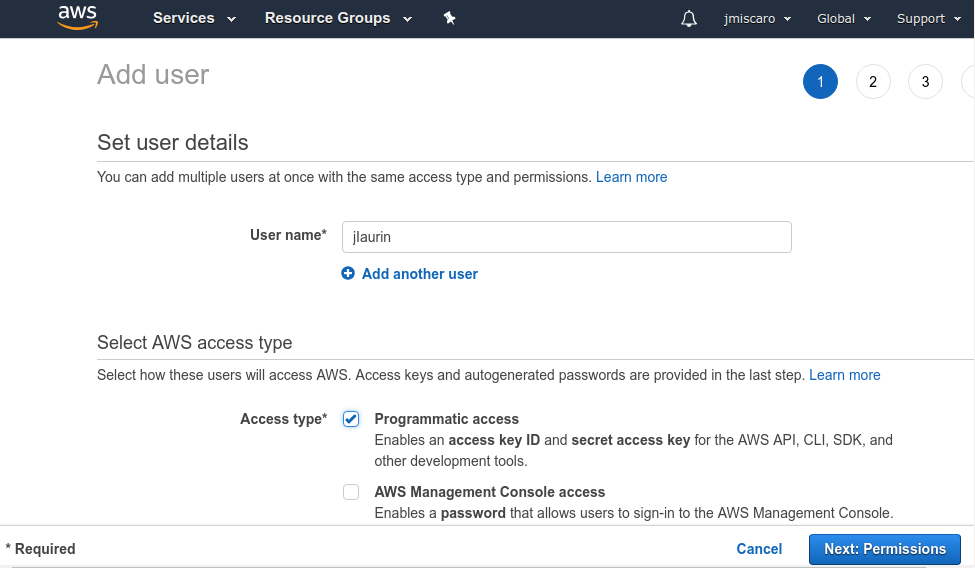
If you see a pop-up with the button "Get Started with IAM Users" go ahead and click on it and then "Add user". If you do not see such a pop-up then, in the top bar, choose "Services" > "IAM" > "Users" and then "Add user":

Enter a name for your user and set Programmatic access as the AWS access type
before clicking "Next: Permissions" to continue.
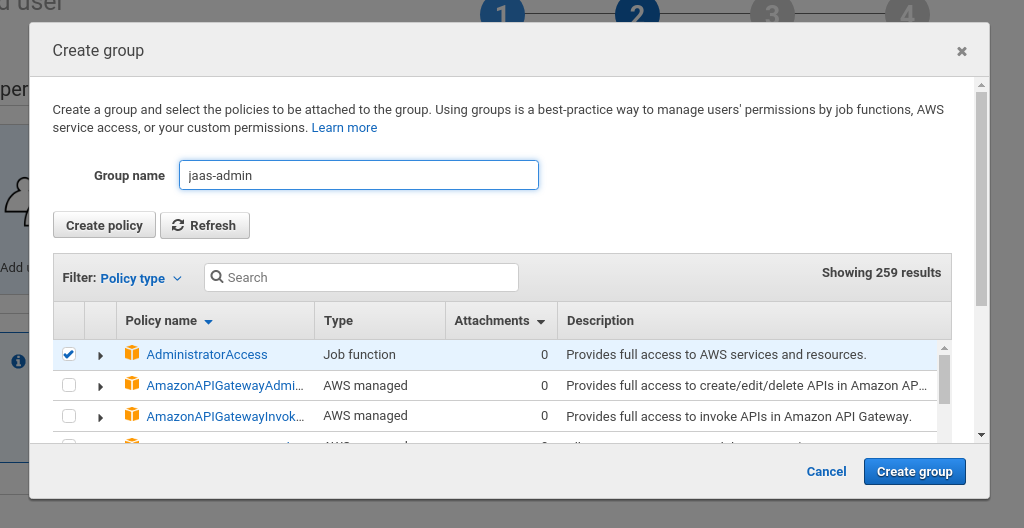
On the next page create a group which, by default, will contain your new user.
Name the group and select one or many pre-existing policies that correspond to
your requirements. Here we've chosen AdministratorAccess, which is the most
privileged policy available:

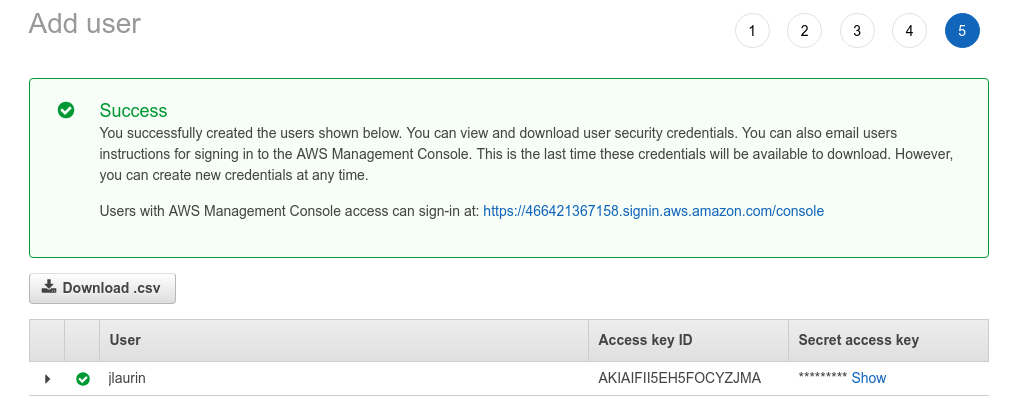
Click the "Create group" button and then the "Next: Tags" button. Tags are optional and here we immediately pressed "Next: Review". On the next page click "Create user". The resulting page will declare user creation a success:

Click on the "Download .csv" button to get a copy of this user's credentials. The contents of this file will look similar to this:
jlaurin,,AKIAIFII8EH5BOCYSJMA,WXg6S5Y1DvwuGt72LwzLKnItt+GRwlkn668sXHqq,https://466421367158.signin.aws.amazon.com/console
The next section will have you add credentials to Juju in the form of an "access-key" and a "secret-key". In the above, these correspond to 'AKIAIFII5EH5FOCYZJMA' and 'WXg6S5Y1DvwuGt72LwzLKnItt+GRwlkn668sXHqq'.
Adding credentials
The Credentials page offers a full treatment of credential management.
In order to access Amazon AWS, you will need to add credentials to Juju. This can be done in one of three ways (as shown below).
Alternately, you can use your credentials with Juju as a Service, where charms can be deployed within a graphical environment that comes equipped with a ready-made controller.
Using the interactive method
Armed with the gathered information, credentials can be added interactively:
juju add-credential aws
The command will prompt you for information that the chosen cloud needs. An example session follows:
Enter credential name: jlaurin

Using auth-type "access-key".

Enter access-key: AKIAIFII5EH5FOCYZJMA

Enter secret-key: ******************************

Credential "jlaurin" added locally for cloud "aws".
Using a file
A YAML-formatted file, say mycreds.yaml, can be used to store credential
information for any cloud. This information is then added to Juju by pointing
the add-credential command to the file:
juju add-credential aws -f mycreds.yaml
See section Adding credentials from a file for guidance on what such a file looks like.
Using environment variables
With AWS you have the option of adding credentials using the following environment variables that may already be present (and set) on your client system:
AWS_ACCESS_KEY_ID
AWS_SECRET_ACCESS_KEY
Add this credential information to Juju in this way:
juju autoload-credentials
For any found credentials you will be asked which ones to use and what name to store them under.
On Linux systems, files $HOME/.aws/credentials and $HOME/.aws/config may be
used to define these variables and are parsed by the above command as part of
the scanning process.
For background information on this method read section Adding credentials from environment variables.
Creating a controller
You are now ready to create a Juju controller for cloud 'aws':
juju bootstrap aws aws-controller
Above, the name given to the new controller is 'aws-controller'. AWS will provision an instance to run the controller on.
For a detailed explanation and examples of the bootstrap command see the
Creating a controller page.
AWS specific features
Features supported by Juju-owned instances running within AWS:
-
Consistent naming, tagging, and the ability to add user-controlled tags to created instances. See Instance naming and tagging for more information.
-
Juju's default AWS instance type is m3.medium. A different type can be selected via a constraint:
juju add-machine --constraints 'instance-type=t2.medium'. For more information see Constraints. You can also view the list of Amazon EC2 instance types. -
A controller can be placed in a specific virtual private cloud (VPC). See Passing a cloud-specific setting for instructions.
Next steps
A controller is created with two models - the 'controller' model, which should be reserved for Juju's internal operations, and a model named 'default', which can be used for deploying user workloads.
See these pages for ideas on what to do next: