Your first charm starts here!
Okay, so you have read up all the background info on what a charm is, how it works, and what parts of the charm do what, now it is time to dust off your favourite code editor (no arguments please) and get charming!
Although it is possible to create a charm without using anything other than a text editor, we are also going to make use of the very excellent time saving plugin for Juju, Charm Tools.
Install the Charm Tools now. Then hurry back.
For this example, we are imagining that we want to create a charm for the Vanilla forum software
Prepare yourself
As we are writing a charm, it makes sense to create it in a local charm repository (see how to deploy from a local repository here) to make it easy to test in your Juju environment.
Go to your home directory (or wherever is appropriate and make the appropriate file structure:
cd ~
mkdir -p charms/precise
cd charms/precise
Create a bare bones charm with Charm Tools
Using the charm tools plugin, we can create the directory structure we need for our charm quickly and easily:
charm create vanilla
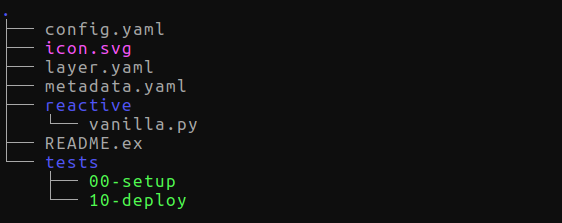
This not only creates the directory structure, it also populates it with template files for you to edit. Your directory will now look like this:

Create the README file
Fire up your text editor and load/edit the README file.
This step is especially important if you intend making your charm public, but it is very useful even if your charm will only ever be seen by you. The README is a good place to make notes about how the charm works, what information it expects to communicate and how.
Although a plain text file is fine, you can also write your README file using Markdown (in which case use the .md suffix). The advantage of this, other than it looks quite neat, is that the Charm Store will render Markdown properly online, so your README will look and read better.
Here is a quick example README file for our Vanilla charm:
 # Overview
 Vanilla is a powerful open source web-based forum. This charm will deploy
 the forum software and connect it to a running MySQL database. This charm
 will install the Vanilla files in /var/www/vanilla/
 # Installation
 To deploy this charm you will need at a minimum: a cloud provider,
 working Juju installation and a successful bootstrap. Once bootstrapped,
 deploy the MySQL charm and then this Vanilla charm:
     juju deploy mysql
     juju deploy vanilla
 Add a relation between the two of them:
     juju add-relation mysql vanilla
 And finally expose the Vanilla application:
     juju expose vanilla
Obviously, you can include any useful info you wish.
Make some metadata.yaml
The metadata.yaml file is really important. This is the file that Juju reads
to find out what a charm is, what it does and what it needs to do it.
The YAML syntax is at once simple, but exact, so if you have any future problems
with Juju not recognising your charm, this is the first port of call! The
information is stored in simple <key> : <value> associations. The
first four are pretty self explanatory:
name: vanilla
summary: Vanilla is an open-source, pluggable, multi-lingual forum.
maintainer: Your Name <your@email.tld>
description: |
  Vanilla is designed to deploy and grow small communities to scale.
  This charm deploys Vanilla Forums as outlined by the Vanilla Forums
  installation guide.
tags: social
The summary should be a brief description of the application being deployed, whereas the description can go into more detail.
The next value to define is the tag. This is primarily for organising the charm in the charm store. The available tags are:
- analytics
- big_data
- ecommerce
- openstack
- cloudfoundry
- cms
- social
- streaming
- wiki
- ops
- backup
- identity
- monitoring
- performance
- audits
- security
- network
- storage
- database
- cache-proxy
- application_development - use this for platform charms like Rails, Django, etc.
- web_server
Your charm can belong to more than one tag, though in almost all cases it should be in just one. Because there could be more than one entry here, the YAML is formatted as a list:
tags:
   - social
   - wiki
   - ecommerce
Next we need to define which relations are actually provided or required by this application. This is done by listing the relation type (provides, requires, or peers), the name of the relation, followed by the interface type, indenting each level.
Our Vanilla charm is a web-based application which "provides" a simple HTTP interface:
provides:
  website:
    interface: http
The relation name given here (website) is important as it will be used to name the relation hooks that we write later. Juju uses the interface name to determine the other charms in the model which can be related to this one.
Similarly we also need to provide a "requires" section. In this case vanilla needs a connection to a database. Checking out the metadata of the charm for MySQL we can see that it provides this via the interface name "mysql", so we can use this name in our metadata.
The final file should look like this:
name: vanilla
summary: Vanilla is an open-source, pluggable, themeable, multi-lingual forum.
maintainer: Your Name <your@email.tld>
description: |
  Vanilla is designed to deploy and grow small communities to scale.
  This charm deploys Vanilla Forums as outlined by the Vanilla Forums installation guide.
tags:
  - social
provides:
  website:
    interface: http
requires:
  database:
    interface: mysql
For some charms you will want a "peers" section also. This follows the same format, and its used for optional connections, such as you might use for interconnecting applications in a cluster
Writing hooks
As you will know from your thorough reading of the charm components, the hooks are the important scripts that actually do things. You can write hooks in whatever language you can reasonably expect to execute on your deployed environment (e.g. Ubuntu Server).
For our charm, the hooks we will need to create are:
- start - for when the application needs to be started.
- stop - for stopping it again.
- install - for actually fetching and installing the Vanilla code.
- database-relation-changed - this will run when we connect (or re-connect, or disconnect) our application to the MySQL database. This hook will need to manage this connection.
- website-relation-joined - this will run when/if a application connects to our charm.
So first up we should create the hooks directory, and start creating our first hook:
mkdir hooks
cd hooks
vi start
(Use your favourite editor, naturally - no flames please)
We have started with the start hook, because it is pretty simple. Our charm will be served up by Apache, so all we need to do to start the service is make sure Apache is running:
#!/bin/bash
set -e
service apache2 restart
A bit of explanation for this one. As we are writing in bash, and we need the files to be executable, we start with a hash-bang line indicating this is a bash file. the set -e line means that if any subsequent command returns false (non- zero) the script will stop and raise an error - this is important so that Juju can work out if things are running properly.
The final line starts the Apache web server, thus also starting our Vanilla service. Why do we call 'restart'? One of the important ideas behind hooks is that they should be 'idempotent'. That means that the operation should be capable of being run many times without changing the intended result (basically). In this case, we don't want an error if Apache is actually already running, we just want it to run and reload any config changes.
Once you have saved the file, it is important to make sure that you set it to be executable too!
chmod +x start
With the easy bit out of the way, how about the install hook? This needs to install any dependencies, fetch the actual software and do any other application specific configuration. Here is an example for our vanilla charm:
#!/bin/bash
set -e # If any command fails, stop execution of the hook with that error
apt-get install -y apache2 php5-cgi php5-mysql curl php5-gd wget libapache2-mod-php5
dl="https://github.com/vanillaforums/Garden/archive/Vanilla_2.0.18.8.tar.gz"
# Grab Vanilla from upstream.
status-set maintenance "Fetching and installing Vanilla"
wget "$dl" -O /tmp/vanilla.tar.gz
# IDEMPOTENCY is very important in all charm hooks, even the install hook.
if [ -f /var/www/vanilla/conf/config.php ]; then
  cp /var/www/vanilla/conf/config.php /tmp/
  rm -rf /var/www/vanilla
fi
# Extract to a known location
juju-log "Extracting Vanilla"
tar -xvzf /tmp/vanilla.tar.gz -C /var/www/
mv /var/www/vanilla-Vanilla* /var/www/vanilla
if [ -f /tmp/config.php ]; then
  mv /tmp/config.php /var/www/vanilla/conf/
fi
chmod -R 777 /var/www/vanilla/conf /var/www/vanilla/uploads /var/www/vanilla/cache
status-set maintenance "Creating apache2 configuration"
cat <<EOF > /etc/apache2/sites-available/vanilla.conf
<VirtualHost *:80>
  ServerAdmin webmaster@localhost
  DocumentRoot /var/www/vanilla
  <Directory /var/www/vanilla>
    Options Indexes FollowSymLinks MultiViews
    AllowOverride All
    Order allow,deny
    allow from all
  </Directory>
  ErrorLog \${APACHE_LOG_DIR}/vanilla.log
  LogLevel warn
  CustomLog \${APACHE_LOG_DIR}/access.log combined
</VirtualHost>
EOF
a2dissite 000-default
a2ensite vanilla
service apache2 reload
status-set blocked "Waiting for active database connection"
We aren't going to go for a line-by-line explanation of that, but there are a few things worth noting
Firstly, note the use of the -y option of the apt-get command. this assumes a 'yes' answer to any questions and removes any manual install options (e.g. packages that have configuration dialogs when they install).
In our script, we are fetching the tarball of the Vanilla software. In these cases, it is obviously always better to point to a specific, permanent link to a version of the software.
Also, you will notice that we have used the juju-log command and the
status-set command. These are helper commands for Juju hooks (known as
"Hook tools") and you will find them covered in more detail
in the "how hooks are run" page.
The status-set command is used to update the status and message displayed by
Juju when users run the juju status command to see what is going on in the
environment. There are a number of pre-defined statuses explained in more
detail status reference page. It is a good idea
to think about updating the status when significant events occur which have an
effect on the operation of the application.
The juju-log command basically spits messages out into the Juju log, which is
very useful for testing and debugging. We will cover that in more detail later
in this walk through.
The next step is to create the relationship hooks...
We know from our metadata that we have a connection called 'database', so we can have hooks that relate to that. Note that we don't have to create hooks for all possible events if they are not required - if Juju doesn't find a hook file for a particular action, it just assumes everything is okay and carries on. It is up to you to decide which events require a hook.
Let's take a stab at the 'database-relation-changed' hook:
#!/bin/bash
set -e # If any command fails, stop execution of the hook with that error
db_user=$(relation-get user)
db_db=$(relation-get database)
db_pass=$(relation-get password)
db_host=$(relation-get private-address)
if [ -z "$db_db" ]; then
  juju-log "No database information sent yet. Silently exiting"
  exit 0
fi
vanilla_config="/var/www/vanilla/conf/config.php"
cat <<EOF > $vanilla_config
<?php if (!defined('APPLICATION')) exit();
\$Configuration['Database']['Host'] = '$db_host';
\$Configuration['Database']['Name'] = '$db_db';
\$Configuration['Database']['User'] = '$db_user';
\$Configuration['Database']['Password'] = '$db_pass';
EOF
chmod -R 777 /var/www/vanilla/conf
juju-log "Make the application port available, now that we know we have a site to expose"
status-set active
open-port 80
You will notice that this script uses the command relation-get. This is another Juju Hook tool, which in this case fetches the named values from the corresponding hook on the charm we are connecting to. Usually there will be some indication of what these values are, but you can always inspect the corresponding hooks to find out. In this case we know that when connected, the 'mysql' charm will create a database and generate random values for things like a username and password.
Interfaces in general are determined by the consensus of the charms which use them. There is a lot more information on decoding interfaces here. Some of the major interfaces are being documented to make it easier to use them, and fortunately, mysql is one of them - You can find a description of the mysql interface here.
These values will all be set at one time, so the next little bit of script just checks one value to see if it exists - if not the corresponding charm hasn't set the values yet.
When it has the values we can use these to modify the config file for Vanilla in the relevant place, and finally open the port to make the application accessible.
The final hook we need to write is website-relation-joined for other
applications which may want to connect to Vanilla via the website relation:
#!/bin/sh
relation-set hostname=`unit-get private-address` port=80
Here we can see the other end of the information sharing - in this case relation-set exposes the given values to the connecting charm. In this case one of the commands is backticked, as unit-get is another helper command, in this case one which returns the requested value from the machine the charm is running on, specifically here it is the private IP address.
So, any connecting charm will be able to ask for the values hostname and
port. Remember, once you have finished writing your hooks make sure they are
all executable by using the chmod +x command.
For our simplistic charm, that is all the hooks we need for the moment, so now we can test it out!
Run the charm proof tool
Another part of the Charm Tools plugin is a useful lint-like tool which will check for errors in the files of your charm. Run it like this:
charm proof [CHARM_DIRECTORY]
The output classifies messages as:
- I - for information
- W - A warning; something which should be looked at but won't necessarily stop the charm from working.
- E - An error; these are blocker which must be fixed for the charm to be used.
some example output might be:
E: no copyright file
E: README.ex Includes boilerplate README.ex line 1
I: relation peer-relation has no hooks
Which tells you that you forgot to add a copyright file, you have left some
default text in the README, and one of your relations has no hooks. All useful
stuff.
Testing
Before we congratulate ourselves too much, we should check that the charm actually works. To help with this, we should open a new terminal window and run the following command:
juju debug-log
This starts a process to tail the Juju log file and show us just exactly what is happening. It won't do much to begin with, but you should see messages appearing when we start to deploy our charm. See Viewing logs for more details.
Following our own recipe, in another terminal we should now do the following (assuming you already have a bootstrapped environment):
juju deploy mysql
juju deploy --repository=/home/$USER/charms/ local:precise/vanilla
juju add-relation mysql vanilla
juju expose vanilla
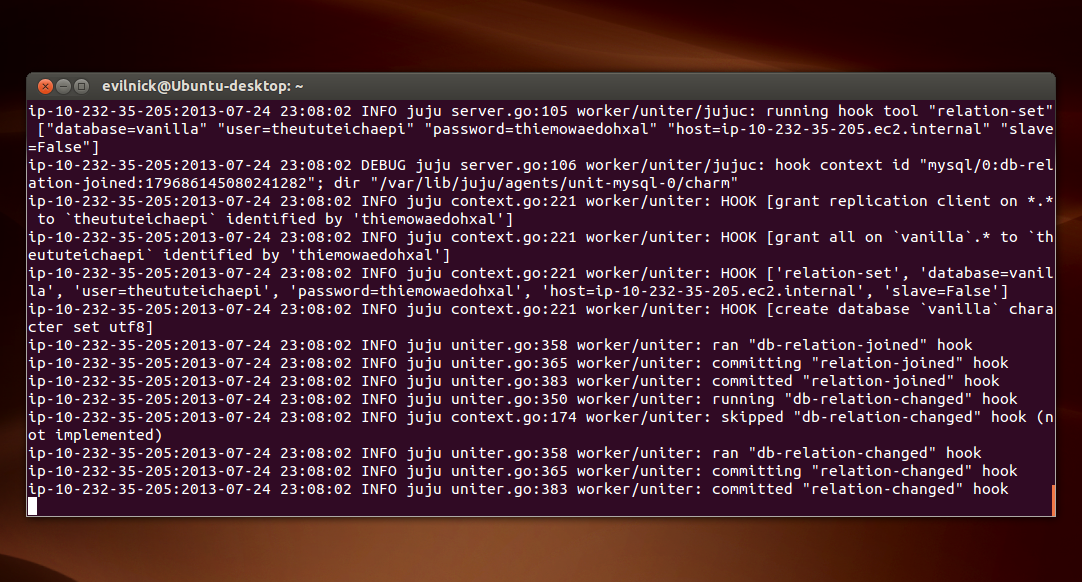
We used the local deploy options to deploy our charm - substitute the path for your own environment. Everything should now be working away, and your log window will look something like this:

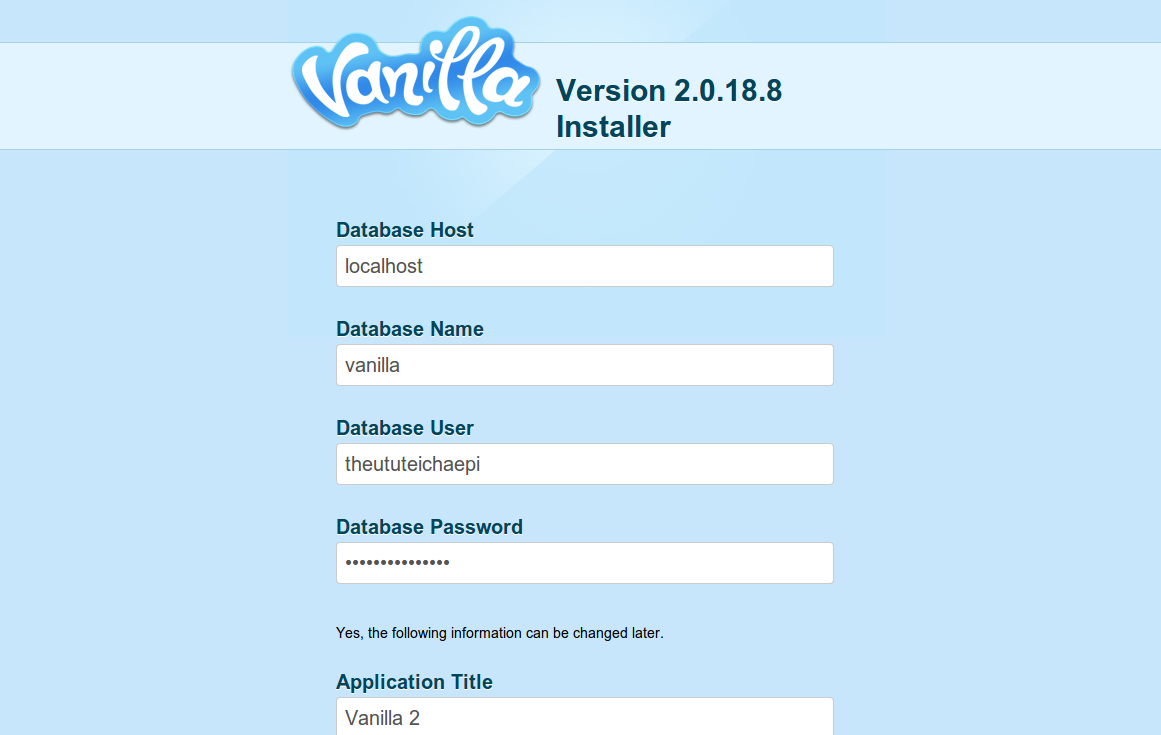
If you wait for all the Juju operations to finish and run a juju status command, you will be able to retrieve the public address for the Vanilla forum we just deployed. Copy it into your browser and you should see the setup page (pre-populated with the database config) waiting for any changes. Congratulations!

Tidying up
With the charm working properly, you may consider everything a job well done. If your charm is really great and you want to share it, particularly on the charm store, then there are a couple of things you ought to add.
- Create a file called 'copyright' and place whatever license information you require in there.
- Add a beautiful icon (there is a guide to making one here) so others can recognise it in the charm store!